In terms of "bang for the buck", an aftermarket "Jet
Kit" is hard to beat. From the factory, carburetors are generally
set up to run on the lean side in order to meet EPA emissions requirements.
Unfortunately, EPA mandated standards run counter to getting maximum
power and efficiency from your motor. In effect, a jet kit "richens"
the jetting in the carbs and alters the fuel delivery characteristics
of those carbs, thereby unleashing some lost power and driveability.
Ideally, using a higher flow air filter and exhaust system will alow
you to get the greatest benefit from a re-jet, but even if your motor
is bone stock, you will see a difference (better low end throttle response
and quicker warm-up), just to a lesser extent.These kits are available
from a number of companies. My own experience is with Dyno Jet and Factory
Pro, but there are a few others.
Jet kits are marketed in terms of "stages", (ie Stage I, Stage
II, etc.). These merely reflect the "level" of modification
to a motor. For instance, Stage I would be for a bike with a stock exhaust
system and with the stock air box, Stage II would be for a bike with
an aftermarket exhaust and aftermarket air filter, and Stage III would
be for a bike with more extensive modifications, like head porting and
higher compression.
Messing with carbs was the "last frontier" for me. I would
do oil changes, valve adjustment, and that sort of thing, but carbs?
Hell no! Those things are complicated. In truth, they're not really
complicated at all and, if you have basic skills, you can do this job.
I will tell you that tuning can be somewhat time consuming, but I would
much rather spend some of my time than pay a mechanic (who may or may
not be more knowledgeable than me) $65 an hour to do this job. As you
may have guessed, these pics are of the carbs from a 1990 Katana 750.
Generally, these basics are the same for most Mikuni Constant Velocity
(CV) carbs.
Well, I guess it's time to see what this involves.
First, the carbs need to be removed (this is probably the most time
consuming part). The tank and the left side panel have to go, along
with the throttle and choke cables. Getting the carbs clear of the airbox
can be a PITA, but that's just one of the things you have to deal with.
Doing it for the first time can be painful, though.
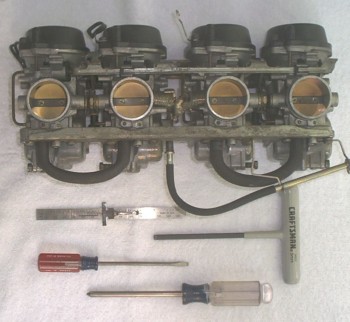
This picture shows you where you'll actually begin and the tools that
are required. Not much, huh? Hell, you probably have these tools in
your "junk drawer" in the kitchen. Some people prefer to use
a set of calipers instead of a ruler. Suit yourself. That allen wrench
is a 5mm size.
When you pull the carbs, there will be a small amount of gas in the
bowls. Try to keep them level while you're removing them. This picture
shows where the drain screws are. The outer carbs require a 5mm allen
wrench, while the inner drain screws take a phillip's head screwdriver.
You don't have to run the screws all of the way out. After a few turns,
the gas will drain from a hole below the screw. Oh, I guess I forgot
to mention that you might need a jelly jar or something to catch the
gas . (Think of our environment for just a moment, you inconsiderate
slob - that's a joke fer chrissake). Examine the gas that came out of
the bowls. Are there small specks of dirt floating around in there?
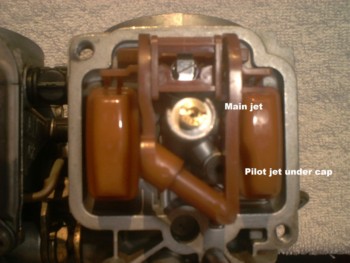
This picture is a view of what you'll find when you flip the carbs over
and remove the bowls. That is the float assembly and the main jet is
labelled. You'll see the pilot jet in the next step. Main jets are included
in the kit. Changing main jets (and needles) will affect upper mid-range
(say 5K-7.5K RPM) operation and top end. The pilot jets affect idle
and part-throttle operation and are located under the little rubber
cap (just below and to the right of the main jet). You shouldn't have
to change the pilot jets. Idle operation will be taken care of later.
I warn you that those bowl screws are often seized and it is common
to chew them up trying to get them out. If you have a small impact driver,
it might come in handy, here.
You may find dirt in the bowls and inside the carb. Be sure to spray
everything down with carb cleaner (especially the pilot jet). Ideally,
you don't want a speck of dirt inside the carb. One small piece of crud
is enough to block up that pilot jet. Hold each of the jets up to a
light and see if they're blocked.
Carefully lift the float assembly out of the carb and this is what you'll
see. The pilot jet is recessed under that black cap. Check the O-rings
(2 of them) on the float assembly to ensure that they're not swelled
or damaged. Those O-rings can be the cause of a hard starting or flooding
problems.
Unscrew the main jet and replace with the appropriate jet from the kit
depending on the modification level of your bike. Be honest with yourself.
If the bike is stock, don't try to use the largest jets in the kit or
you will gain something called "experience" by doing this
all over again.
Replace the rubber cap, the float assembly, and the bowl. Don't forget
that cap. If you leave one out, you'll have major idle problems and
if you lose one, you can't "make" a cap from something else.
Trust me on this one.
At the bottom of this picture is the pilot adjustment screw. If your
carbs have never been touched, there should be a metal cap on that screw
(remember the EPA?). Your kit will include instructions to remove that
cap. Properly adjusting that screw will make all of the difference in
the world as to how your bike runs. Set it as recommended by the maker
of the kit. 2 - 2.5 turns out from the bottom is the usual starting
point. Turn the screw "in" (that's clockwise) until it bottoms
(you don't have to wail on it), then back it out the desired number
of turns. You will probably find that these screws are set at anywhere
from .25 - 1.5 turns, from the factory.
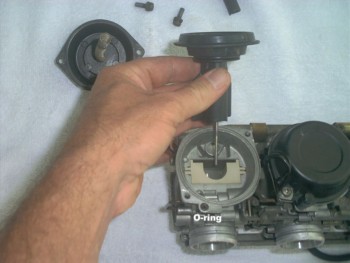
Now, flip the carbs over (right side up) and remove the 2 screws that
hold the black plastic cap. Beware, there is a tiny O-ring under that
cap that seals the synch fitting. If you look at this picture, you may
notice 3 holes. 2 are for the screws and the third, at about the 6:00
position of the opening, is where that O-ring belongs.
As you pull up on the slide, you'll see the needle. Replacement needles
are included in your kit and development of those things is why your
kit cost you $125. Just turn the slide upside down over your hand and
the needle will drop right out. While you're at it, inspect that diaphragm
to make sure there aren't any tears in it. When you put the slide back
in, ensure that the rim of the diaphragm is "seated" in the
carb body.
*note - Dyno Jet kits give you the option to drill the holes in the
bottom of the slide and put an insert in there. I don't remember if
Factory Pro does that.
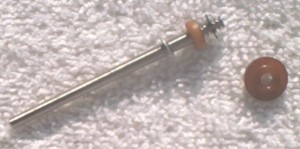
Here's the needle and its associated washers and spacers. This is an
aftermarket needle as it has a number of slots at the top. Varying the
position of the E-clip in those slots will affect upper mid-range operation
and gives you room to "tailor" your set-up. I guess now is
a good time to mention that you'll need a set of needle-nose pliers,
too. (Get it? Needles? Needle nose pliers? That's a joke, son.)
Again, be honest with yourself and follow the directions that came with
the kit.
Well, that's just about it. Reinstall the carbs and fire it up. The
instructions should include some tuning tips. Sorry, there will probably
be some amount of tuning involved, but you should be very close at this
point. If you need some more help in tuning, try the Factory Pro site
or ask at the forum sites I've provided links to on my "Links"
page.
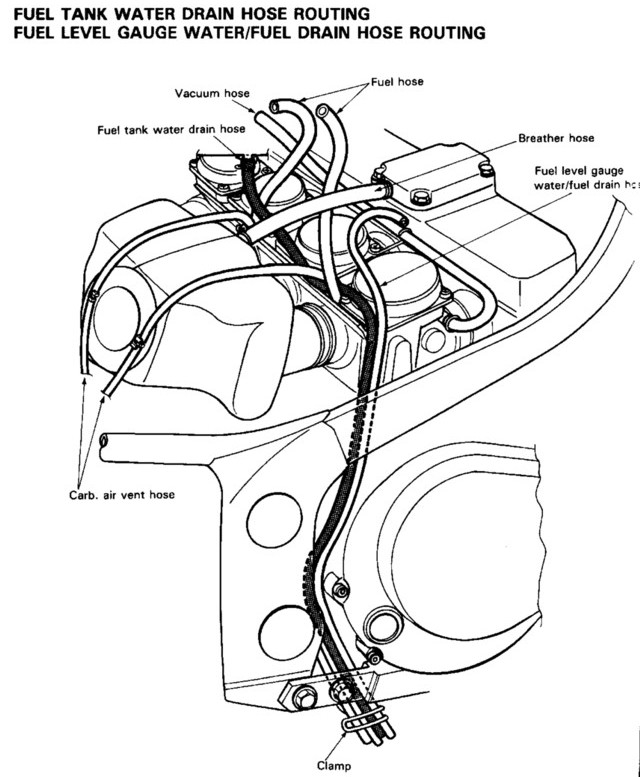
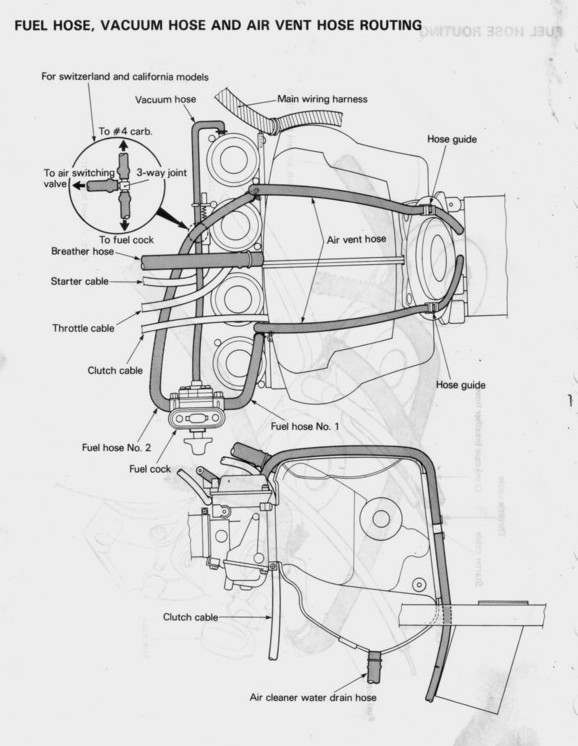
In case you run into problems reconnecting the various hosess, I have
posted the diagrams for the carb, tank, and emissions hoses (those are
3 seperate links). As with any similar job, take notes or pictures of
things like this to help you get it all back together, again.
While you have everything apart, it might be a good idea to check the
gas tank. Rust from your tank or sediment that has accumulated from
fill-ups over the years can cause headaches. Just shine a flashlight
in there. Can you see surface rust or stuff floating around in there?
Just drain the tank, unbolt the petcock, and rinse the tank out with
a little fresh gas. On top of the petcock is a screen that serves as
your gas filter. For the most part, it works pretty well, but it'll
still allow stuff to get by that will plug up a pilot jet. Use the carb
cleaner that you have left over to clean the screen and the petcock.
This may seem unnecessary, but a few extra minutes, now, can save you
a couple of hours, a week or a month down the road.
What I've described here is the job on a pre-'98 750 Katana. If you
are doing this job on a 98+ Katana, you can also check out Tre's page
for some more info and specific recommendations on the final settings.
His pictures are much better, too.
I guess I ought to mention float height. Normally, you would not alter
this, but if you think that it's not set correctly or just want to check
it, click here .
Oh, and by the way, now that you have done this and your bike runs
like it should, you can never operate it on the highway. It is intended
for "closed course operation" only.
Yeah, right...
WRITTEN BY DOUG
|