HEAVY DUTY CLUTCH CONVERSION: This page is intended for educational and tobacco smoking purposes only and attempts to aid in the installation of heavier clutch springs into a 98' (Gen1) Bandit 1200S. While there may be some differences from model to model I'm assuming that the Gen1 and Gen2 600's and 1200's are basically identical. Before you start - Since the clutch cover retains engine oil it's advisable to drain the oil before you remove the cover. While this may also be a good reason to catch up on that oil change, full drainage may be unnecessary. Roll the bike up onto a 2x4 or any spare stock you have around and set it on it's side-stand to lean the case over far enough that you won't loose much, if any, oil in the process. Additionally, put the bike in 1st gear now if you don't have access to air tools. |
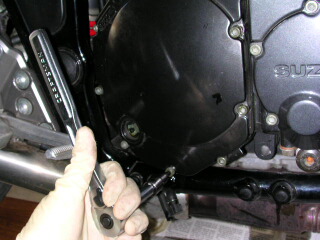
| 1) Remove clutch cover - It's nice to have a spare cover gasket around so you'll never have to use it. |
 |
| 2) Remove internal circlip that holds the pressure plate in with snap-ring pliers - there's a fair amount of tension on these so clean off any oil if you can...this will help the pliers keep grip. |
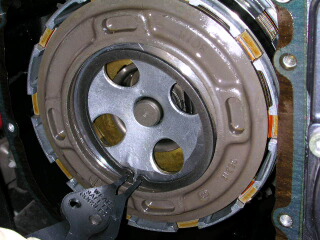 |
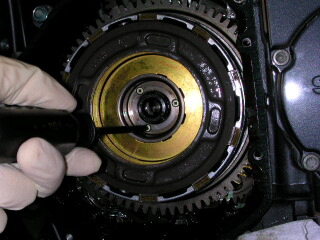
| 3) Remove the pressure plate lifter - if its stubborn at first just wriggle it a bit; there shouldn't be anything holding it in. |
 |
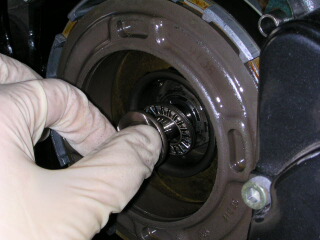
| 4) Remove the pushrod end piece, release bearings, and thrust washers - again, it just slides right out. Note the order of assembly. |
 |
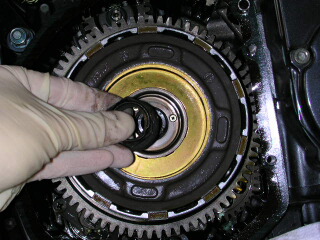
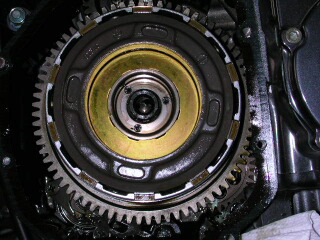
5) Removing the main clutch nut - First, look at the nut and you should see a small indention made with a punch that doesn't show up well in these pictures; pay attention to how this is aligned with the markings right next to them to the inside. You'll want to make sure that upon reinstallation you get these two surfaces back into correct orientation. Here's the tricky part. There are several proposed solutions to getting the clutch nut off but if you're a home mechanic and don't have access to a wealth of pneumatic tools then what I managed to use here is a 30mm 6-sided Axel Nut Socket from a local Auto-parts store (I think Gen2's use 32mm sockets). Hooked it up to a 1/2" ratchet and slipped a long metal bar from a floor jack over it; you'll have to improvise this part or get a breaker bar. The longer the lever arm the less force you'll have to apply. Turn the clutch assembly to take up the slack on the chain, lean on the rear brake, and HEAVE HO! There's mucho torque on that nut! (~150Nm) As a side note: While this worked great, I felt really bad doing this to my chain; if you do it you'll understand why. In the second picture you can faintly see some rags I stashed between the engine and frame to help keep oil from running onto the exhaust below and burning up when the engine gets going again. If oil does get on the pipes be sure to wipe them down real fast to take off the excess, the rest will burn off shortly |
| 6) Remove the axel nut and convex locking washer behind it - when you rest any of these internal parts down after removal be sure they are in a clean container. A little piece of sand or grime could really have fun running around in your clutch for a little while. |
 |
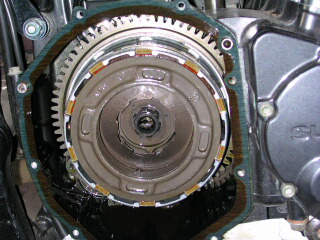
| 7) Now remove the dreaded spring retaining cup screws - While others have reported problems with these my particular ones came right out...use a good quality correctly fitting screwdriver. If yours do happen to be rather troublesome, some have also suggested to use a dab of "valve lapping compound" on the screwdriver to keep it from slipping. Also, you can also wipe as much oil from the head of the screw as possible. Upon reassembly just get them nice and snug, maybe around 8-10ft.lbs. The clutch nut basically provides all of the force to hold the springs in. I've heard some just discard the screws as they really aren't needed for anything. I replaced mine anyway |
 |
| 8) Screws out - now you're ready to remove the diaphragm spring retainer. |
 |
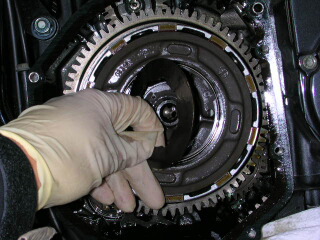
| .9) Pull out the spring retainer - now you have free access to the clutch springs. |
 |
| 10) Reach in and grab them out - there will be two of them and be sure to note their orientation as these are not flat springs. They should be slightly convex as they sit in the bike with the center closer to you (further out from the bike) than the edges. |
 |
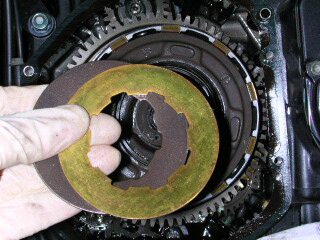
| .11) Splitting up the union - nothing too tricky here, I just wanted to give you a sense of what these things look like. |
 |
12) Swap your springs and reinstall in reverse order - in this case I used and only swapped out one spring supplied from Dale Walker's Holeshot Products. You can reinstall the springs in any order since they effectively work as one spring together but I'd also recommend covering the new spring with a coat of oil before installation; you should probably have some right below the clutch in the case. This is probably unnecessary but I figure it's a peace of mind thing. If you're worked into the "Wrenching Zone" this might also be a good time to put in new clutch fluid if you haven't done so in a while. If you are basking in the warming glowing warmth of Clutch Zen, you could also remove your clutch lever with a couple 10mm wrenches, clean off the grime between the lever and body, apply a few dabs of grease, and reinstall. After reassembly check the pressure required to operate your clutch lever. OH YEAH BABY!!!! Crazy Carl's B12S Clutch Page |
 |
